
A sharp brushcutter blade makes the work both easier and more efficient. When the blade starts to become dull, more force is required to cut through brushwood and stems, while the clearing may also become less even. Regular inspection and proper sharpening therefore help maintain the blade’s cutting performance.
But how do you actually sharpen a brushcutter blade correctly? In this guide, we go through the process step by step and also look at common mistakes that can affect the result.
Important: Not all brushcutter blades are sharpened in the same way. Always follow the instructions for the specific blade model you are using. Carbide-tipped blades, for example, normally require sharpening with specialised equipment and should not be hand-filed in the same way as a traditional steel blade.
Why Does a Brushcutter Blade Need Sharpening?
Every time the blade’s teeth cut through wood, brushwood and other vegetation, the cutting edge is subjected to wear. Contact with soil, stones and other hard materials can cause the blade to lose its sharpness even faster.
A well-maintained brushcutter blade can provide:
- more efficient cutting of brushwood and stems
- less need to force the blade through the material
- smoother and more controlled clearing
- better workflow with fewer interruptions
- longer service life before the blade needs to be replaced
It is therefore advisable to inspect the blade regularly rather than waiting until it becomes heavily worn.
How Do You Know When a Brushcutter Blade Needs Sharpening?
The clearest sign is that the blade no longer cuts as efficiently as it used to. For example, you may notice that you need to use more force or that it takes longer to cut through the same type of vegetation.
Other signs may include:
- the blade slides against the stem instead of cutting into it directly
- clearing requires more force than usual
- the cutting edges of the teeth feel or appear rounded
- the blade has come into contact with stones or other hard objects
- the cutting result has become uneven
It is a good idea to carry out a quick visual inspection of the blade whenever the brushcutter is switched off for cleaning or maintenance.
What You Need to Sharpen a Brushcutter Blade
The tools you need depend on the type of blade you are using. For a brushcutter blade that can be sharpened with a file, you may need:
- a file suited to the blade’s tooth profile
- a filing guide or file holder
- a vice or other secure fixture
- gloves
- a cleaning brush or cloth
- a tool for checking the tooth set, if required for the blade type
A filing guide makes it easier to maintain the same angle from tooth to tooth. This reduces the risk of sharpening the blade unevenly.
How to Sharpen a Brushcutter Blade Step by Step
1. Remove and Inspect the Blade
Switch off the brushcutter completely and remove the blade according to the machine manufacturer’s instructions.
Clean the blade to remove resin, dirt and other deposits so that the teeth are clearly visible. At the same time, check the blade for cracks, severe deformation or other damage.
A damaged blade should not continue to be used simply because it has been sharpened.
2. Secure the Blade Properly
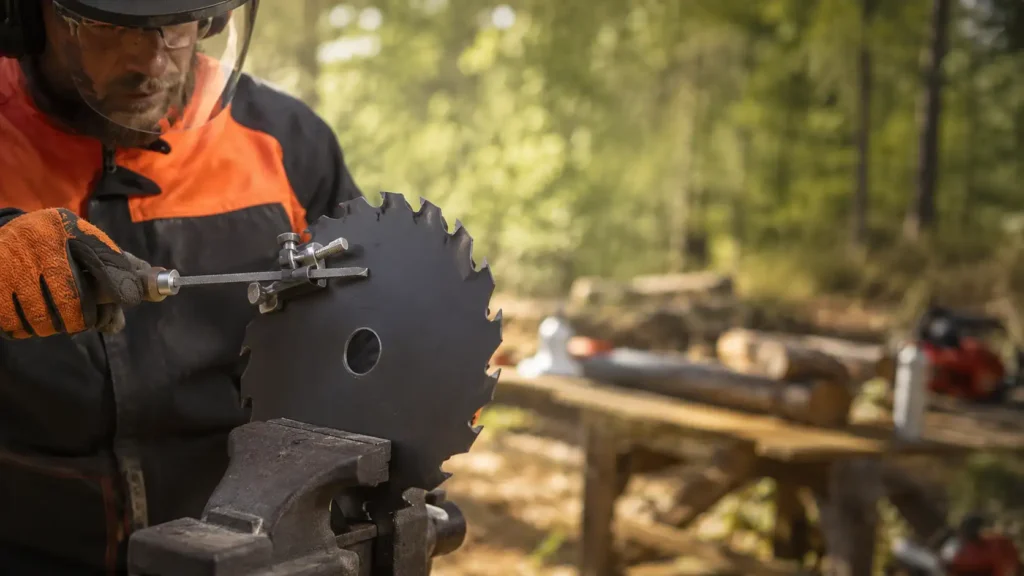
Place the blade in a vice or fixture so that it remains stable while you work. The blade should not be able to move while you are sharpening it.
A secure fixture makes it easier to maintain the correct filing angle and achieve a consistent result across all teeth.
At the same time, do not clamp the blade more tightly than necessary.
3. Determine the Correct Filing Angle
The filing angle is crucial to how the tooth will cut after sharpening. The exact angle and method vary between different blade types.
Therefore, use the sharpening instructions or filing guide designed for your blade. A guide makes it much easier to maintain the same motion and angle on every tooth.
For Strand Original, for example, there is a dedicated filing guide designed specifically for the blade’s tooth geometry.
4. Sharpen One Tooth at a Time
Position the file against the tooth at the correct angle and use smooth, controlled strokes.
Try to use approximately the same number of strokes on each tooth. The aim is not to remove as much material as possible, but to restore a sharp and even cutting edge.
Avoid altering the tooth’s original geometry more than necessary.
A good approach is to mark the first tooth with a pen. This makes it easy to see when you have worked your way around the entire blade.
5. Check That the Teeth Are Evenly Sharpened
Once all the teeth have been sharpened, you should inspect the blade once again.
Look for:
- even cutting edges
- consistent tooth shape around the entire blade
- teeth that have become unusually short or damaged
- cracks or other damage that was not visible before sharpening
If individual teeth have been sharpened significantly more than the others, the blade may cut unevenly.
6. Check the Tooth Set
On some types of brushcutter blades, the teeth are set, meaning that they are slightly bent in alternating directions. The tooth set helps create a sufficiently wide kerf for the blade.
If the tooth set has become uneven, the blade’s cutting performance may be affected even if the cutting edge itself is sharp.
Use the correct tool and follow the blade manufacturer’s specifications and instructions when checking or adjusting the tooth set.
Common Mistakes When Sharpening a Brushcutter Blade
Sharpening at the Wrong Angle
An incorrect filing angle can alter the tooth geometry and reduce the blade’s cutting performance. Use a filing guide if one is available for your blade model.
Sharpening Some Teeth More Than Others
If some teeth become significantly shorter than the others, the load may be distributed unevenly. Therefore, work systematically around the entire blade.
Waiting Too Long Between Sharpenings
A slightly dull cutting edge is much easier to restore than a tooth that has become severely worn. Regular inspection makes maintenance easier.
Trying to Sharpen a Carbide-Tipped Blade by Hand
A carbide-tipped blade should not be treated like a conventional steel blade that can be sharpened with a file. This type of cutting edge requires specialised sharpening equipment.
Continuing to Use a Damaged Blade
Sharpening can restore the cutting edge, but it cannot repair cracks, severe deformation or seriously damaged teeth. Therefore, always check the condition of the blade before continuing to use it.
How Often Should You Sharpen a Brushcutter Blade?
There is no single interval that suits everyone. How quickly the blade becomes dull depends on factors such as:
- the type of vegetation you are clearing
- how frequently you use the brushcutter
- the type of blade you use
- whether the blade comes into contact with the ground or stones
- the blade’s material and tooth geometry
Therefore, base your decision primarily on the blade’s cutting performance. When you notice that it is starting to perform less effectively, it is often better to carry out some light maintenance sharpening rather than continue until the cutting edge becomes heavily worn.
Different Brushcutter Blades Require Different Maintenance
It is important to distinguish between different types of blades. A traditional steel blade, an all-purpose blade and a carbide-tipped blade may have completely different sharpening and maintenance requirements.
Before you begin, you should always check which type of blade you are using and which instructions apply to that specific model.
If you need to replace your blade or want to compare different options, you can read more about Strand’s brushcutter blades for different types of clearing work.
How to Make Your Brushcutter Blade Last Longer
Good maintenance involves more than just sharpening. A few simple habits can help the blade retain its performance for longer:
- avoid contact with the ground and stones as much as possible
- clean the blade regularly
- inspect the teeth and blade body after heavy impact
- sharpen the blade before the cutting edge becomes severely worn
- store the blade in a dry, protected place
- always use the correct sharpening or grinding method for the blade type
It can be particularly useful to inspect the blade after a day of clearing close to the ground, along roadsides or in rocky terrain.
Conclusion
Sharpening a brushcutter blade does not have to be complicated, but precision is important. Secure the blade firmly, use the correct file and filing angle, and work systematically so that all teeth are sharpened evenly.
Also remember that different blades have different requirements. Always check the manufacturer’s recommendations before you begin sharpening or grinding.
With regular maintenance, you can keep the blade sharp and create better conditions for efficient and controlled clearing.


 English
  Svenska